持久力のためのチアの使用
持久力を向上させるチアの使用法について、チアシードが持つ健康上の利点を詳しく解説します。

ココナッツミルクケフィア
私たちのココナッツミルクケフィアレシピには、ココナッツミルクをケフィアに発酵させるのに役立つ少量の砂糖が含まれていますが、変更されたケトダイエットを行っている人にとっては素晴らしいオプションです。無糖のココナッツフレーク、刻んだナッツ、そしてほんの一握りの新鮮なベリーで作られたココナッツベースのシリアルの液体としてこれを使用してください。ベリーは少量の炭水化物を提供しますが、食事のバランスを取り、より満足のいく食感を与えるのに役立ちます。
インスタントポット機能:ヨーグルト
特別なツール:インスタント読み取り温度計、ガラス収納ジャー
ダイエットに適しています:グルテンフリー、ケト、ビーガン、ベジタリアン
準備時間: 5分
調理時間: 17時間
収量: 9人前
材料
2つの13.5オンス缶無糖ココナッツクリーム
生きている活発な文化または1カプセル(空)のプロバイオティクス粉末を含む大さじ2杯のココナッツヨーグルト
メープルシロップ大さじ2
味付けされていないゼラチン小さじ2
方向
ココナッツクリームをインスタントポットに追加し、蓋を閉じて、画面に「ボイル」と表示されるまでヨーグルト設定を2回押します。ふたを固定します。
インスタントポットがビープ音を鳴らしたら、蓋を外して温度を確認します。少なくとも180度を読み取る必要があります。そうでない場合は、ソテーに設定し、180度に達するまで加熱を続けます。
あなたの台所の流しで、あなたの鍋に合う氷浴を作ってください。鍋を氷浴に入れます。ミルクが105から110度の温度範囲に達するまで絶えずかき混ぜます。次に、ココナッツヨーグルトまたはプロバイオティクスパウダー、メープルシロップ、ゼラチンを泡だて器で混ぜます。1分間泡だて器を続けます。
鍋の底を拭いて乾かします。インスタントポットに戻し、蓋を固定します。
ヨーグルト設定を押し、時間を16時間に設定し、開始を押します。
ケフィアが完成したら、貯蔵ジャーに沸騰したお湯を追加します。5分間放置してから、水を捨てて瓶を風乾させます。ケフィアを瓶に注ぎ、蓋を固定し、冷蔵庫で最大10日間、または冷凍庫で最大1か月間保管します。
ケフィアを長く発酵させるほど、薄くてヨーグルトのような粘稠度になる可能性が高くなります。
蜂蜜を甘味料として使用することは避けてください。蜂蜜に含まれるバクテリアはプロバイオティクスと競合します。
ケフィアが完成した後、新鮮なベリーをブレンドし、最大3日間保存します。より厚い製品を好む場合は、冷蔵する前に小さじ1杯のタピオカ粉を泡だて器で混ぜてみてください。
ポーチドエッグ
あなたが卵のファンなら、あなたはまだケトダイエットでそれらを楽しむことが許されます!卵は栄養豊富な選択肢で、ブロッコリーのみじん切り、ほうれん草、きのこなどの低炭水化物野菜と完璧に調和します。チェダーチーズと刻んだ肉を入れて、高タンパク質の食事を作ることもできます。私たちのポーチドエッグのレシピは、始めるのに最適な場所です。
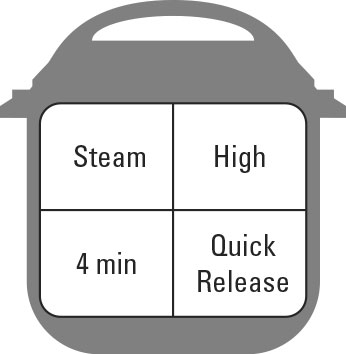
インスタントポット機能:スチーム(高)、クイックリリース
専用工具:シリコンマフィンカップ
ダイエットに適しています:グルテンフリー、ケト、地中海、ベジタリアン
準備時間:なし
調理時間: 4分
収量: 4人前
材料
大きな卵4個
水1カップ
方向
4つのシリコンマフィンカップにクッキングスプレーをスプレーし、各マフィンカップホルダーに1つの卵を割ってください。
マフィンカップをトリベットの上に置きます。鍋に水を注ぎ、トリベットをそっと鍋に下げます。蓋を固定し、Steam(高)に設定します。時間を4分に設定します。
調理が終わったら、キャンセルとクイックリリースを押してベントします。
スプーンを使って、ライナーから卵を注意深くすくい取ります。
卵黄を固くするには、調理時間を5分に増やします。ポーチドエッグを柔らかくするには、調理時間を3分に減らします。
ビーフボーンブロス
あなたの地元の市場で栄光の骨のスープに高額を支払うことを避け、あなたのインスタントポットであなた自身のものを作ってください。私たちのビーフボーンブロスレシピは、ケトダイエットで目立つ傾向がある低炭水化物スープに豊かな風味をもたらすための優れた方法です。さらに、骨はブロスの風味付けに使用されるため、骨ブロスは多くのビタミンやミネラルの優れた供給源です。
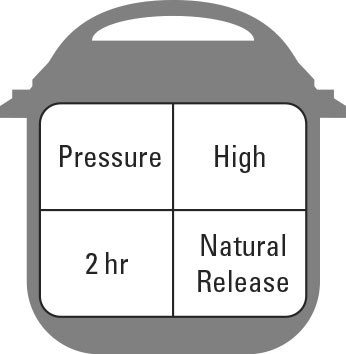
インスタントポット機能:圧力鍋(高)、保温(オン)、自然放出
特別なツール:ガラス収納ジャー
ダイエットに適しています:グルテンフリー、ケト、地中海
準備時間:なし
調理時間: 2時間
収量: 10人前
材料
3ポンドの牛骨
みじん切りにんじん3本
セロリの茎3本、みじん切り
玉ねぎ1個、みじん切り
小さじ1/2の乾燥タイム
1/4カップパセリ
1ベイリーフ
1/4 teaspoon peppercorns
2-1/2 quarts filtered water
Directions
Combine the bones, carrots, celery, onion, thyme, parsley, bay leaf, and peppercorns in the Instant Pot; then pour the filtered water over the top.
Secure the lid and set to Pressure Cook (High) and Keep Warm (On) or use the Soup/Broth setting. Set the time for 120 minutes using the +/– button and press Start.
When cooking completes, do a Natural Release of the pressure for 30 minutes.
Carefully remove the pot from the Instant Pot with oven mitts. Strain the stock with a colander into a clean bowl, and discard the bones and vegetables. Store in the refrigerator up to 5 days or in the freezer up to 4 months.
You can use onion skins, celery stems, and the tops of celery in stock.
To make a rich and robust beef stock roast the bones in the oven for an hour at 400 degrees.
Beef Bone Broth
Avoid paying the high price for a glorified bone broth at your local market, and make your own in your Instant Pot. Our Beef Bone Broth recipe is an excellent way to bring rich flavor to the low-carbohydrate soups that tend to be prominent on the keto diet. Plus, bone broth is a great source for many vitamins and minerals because of the bone used to flavor the broth.
Instant Pot function: Pressure Cook (High), Keep Warm (On), Natural Release
Special tools: Glass storage jars
Fits diets: Gluten-Free, Keto, Mediterranean
Prep time: None
Cook time: 2 hours
Yield: 10 servings
Ingredients
3 pounds beef bones
3 large carrots, chopped
3 celery stalks, chopped
1 large onion, chopped
1/2 teaspoon dried thyme
1/4 cup parsley
1 bay leaf
1/4 teaspoon peppercorns
2-1/2 quarts filtered water
Directions
Combine the bones, carrots, celery, onion, thyme, parsley, bay leaf, and peppercorns in the Instant Pot; then pour the filtered water over the top.
Secure the lid and set to Pressure Cook (High) and Keep Warm (On) or use the Soup/Broth setting. Set the time for 120 minutes using the +/– button and press Start.
When cooking completes, do a Natural Release of the pressure for 30 minutes.
Carefully remove the pot from the Instant Pot with oven mitts. Strain the stock with a colander into a clean bowl, and discard the bones and vegetables. Store in the refrigerator up to 5 days or in the freezer up to 4 months.
You can use onion skins, celery stems, and the tops of celery in stock.
To make a rich and robust beef stock roast the bones in the oven for an hour at 400 degrees.
Seasoned Pulled Pork
Our Seasoned Pulled Pork recipe is very rich, mainly from the fattier pork shoulder used in the recipe. The recipe suggests pairing this with a simple coleslaw, which traditionally is high in fat from mayonnaise. But if you’re on the keto diet, we recommend pairing this recipe with low-carbohydrate veggies to add more fiber to your diet and prevent some of the unfortunate side effects of a high-fat diet, like constipation.
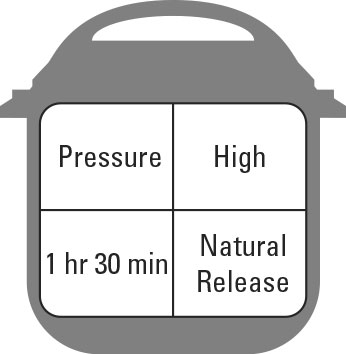
Instant Pot function: Pressure Cook (Normal), Keep Warm (Off), Natural Release
Special tools: Meat thermometer
Fits diets: Gluten Free, Keto
Prep time: 5 minutes
Cook time: 1-1/2 hours
Yield: 12 servings
Ingredients
2 tablespoons blackened seasoning
2 teaspoons garlic powder
1 teaspoon onion powder
1 teaspoon paprika
1/2 teaspoon ground black pepper
1/4 teaspoon salt
4 pounds bone-in pork shoulder
2 cups chicken broth
1 bay leaf
Directions
In a large bowl, mix together the blackened seasoning, garlic powder, onion powder, black pepper, and salt. Add the pork shoulder, and rub the spices into the pork shoulder, covering the entire surface area.
Place the seasoned pork shoulder into the inner pot of the Instant Pot. Top with the remaining spices from the bowl. Pour the chicken broth over the top, add in the bay leaf, and secure the lid.
Set the valve to Sealing and select Pressure Cook (Normal) and Keep Warm (Off), using the +/– button to set the time to 90 minutes.
The final internal temperature of the pork should reach 145 degrees. When cooking completes, do a Natural Release of the pressure for 25 minutes.
Switch the valve to Venting and allow the remaining pressure (if any) to release. Remove the lid and discard the bone, bay leaf, and any excess visible fat from the inner pot.
Using two large forks, begin to shred the pork directly into the broth and spice mixture. Serve immediately.
For a smaller pork shoulder, adjust the time accordingly with the estimate of 22 minutes per pound.
Serve with cabbage slaw on top of a Hawaiian sweet roll or on its own over a salad for a keto-friendly option.
Switch up your seasonings and add your favorite spice blend! If you’re using barbecue sauce, wait until the final stages of serving to add.
Carne Guisada
Though Carne Guisada is traditionally served with tortillas, to remain keto compliant you can serve it alongside some butterleaf lettuce or spoon it into a halved avocado. Avocados are a nutrient-rich food that helps to provide satiety alongside the better-for-you fats that aren’t found in meats.
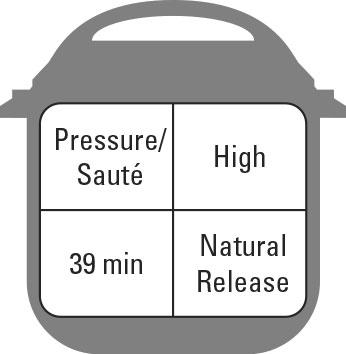
Instant Pot function: Pressure Cook (High), Keep Warm (On), Natural Release, Sauté (High)
Fits diets: Gluten-Free, Keto
Prep time: 10 minutes
Cook time: 39 minutes
Yield: 8 servings
Ingredients
3 pounds beef stew meat, cubed
2 cups beef stock
2 tablespoons tomato paste
1 tablespoon dried oregano
1 teaspoon cumin
4 garlic cloves, chopped
1 large onion, chopped
1 large green bell pepper, chopped
1-1/2 teaspoons salt
2 tablespoons cornstarch
2 tablespoons cold water
Directions
Place the cubed stew meat into the Instant Pot and add the beef stock, tomato paste, oregano, cumin, cloves, onion, bell pepper, and salt. Stir to combine the ingredients, and secure the lid.
Press Pressure Cook (High) on the Instant Pot, adjust the time to 35 minutes using the +/– button, with Keep Warm (On). Do a Natural Release of the pressure for 15 minutes.
Using a slotted spoon, remove the meat to a serving bowl.
In a small bowl, whisk together the cornstarch and water.
Press Sauté (High) and, while whisking, add in the cornstarch slurry. Bring the sauce to a low simmer about 4 minutes; then ladle over the meat and serve.
If you prefer a smoother gravy, use an immersion blender or regular blender to blend the gravy before serving. Work in small batches with a towel over the top of the blender. Serve with flour tortillas or over rice, mashed potatoes, or cauliflower rice.
Korean Beef Bulgogi Bowl
Our Korean Beef Bulgogi Bowl recipe does call for sugar, but to remain keto compliant, you can substitute the brown sugar with stevia or monk fruit. This delicious recipe can certainly fit into your low-carb meal plan when paired with a simple cauliflower rice. Cauliflower rice is a freezer-friendly staple, so you won’t have to spend hours in the kitchen ricing your own.
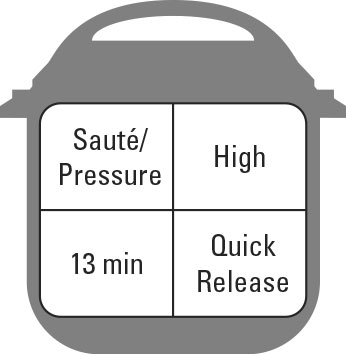
Instant Pot function: Sauté (High), Pressure Cook (High), Keep Warm (Off), Quick Release
Prep time: 5 minutes
Cook time: 13 minutes
Yield: 4 servings
Ingredients
1/3 cup filtered water
1/4 cup low-sodium soy sauce
2 tablespoons rice wine vinegar
2 tablespoons packed brown sugar
2 teaspoons sesame oil
1 teaspoon ground ginger
2 tablespoons cornstarch
1-1/4 pounds lean ground beef
1/2 small onion, chopped
1 teaspoon minced garlic
2 cups chopped bell peppers
2 cups cooked brown rice, divided
2 cups Basic Brown Rice
1 stalk of green onion, chopped, for garnish
1/2 teaspoon red pepper flakes, for garnish
4 teaspoons Sriracha, for garnish
Directions
In a small bowl, whisk together the water, soy sauce, rice wine vinegar, brown sugar, sesame oil, ginger, and cornstarch. Set aside.
Press Sauté (High) on the Instant Pot and add the ground beef. When the beef begins to brown (about 3 minutes), add in the onion, garlic, and bell peppers. Continue to cook for 5 minutes. When finished, press Cancel.
Stir in the sauce and select Pressure Cook (High) and Keep Warm (Off), adjust the timer to 5 minutes using the +/– button, and secure the lid. Ensure the vent is set to Sealing.
When the cooking completes, press Cancel, remove the lid, stir, and portion into 4 bowls, served over 1/2 cup of Brown Jasmine Rice. Garnish as desired with green onion, red pepper flakes, and Sriracha.
To make the recipe keto compliant, substitute a sugar replacement for the brown sugar. Because sugar substitutes are sweeter than sugar, use half the amount. Then serve with cauliflower rice.
Use a tamari sauce in place of soy to make the recipe gluten-free.
Korean Beef Bulgogi Bowl
Our Korean Beef Bulgogi Bowl recipe does call for sugar, but to remain keto compliant, you can substitute the brown sugar with stevia or monk fruit. This delicious recipe can certainly fit into your low-carb meal plan when paired with a simple cauliflower rice. Cauliflower rice is a freezer-friendly staple, so you won’t have to spend hours in the kitchen ricing your own.
Instant Pot function: Sauté (High), Pressure Cook (High), Keep Warm (Off), Quick Release
Prep time: 5 minutes
Cook time: 13 minutes
Yield: 4 servings
Ingredients
1/3 cup filtered water
1/4 cup low-sodium soy sauce
2 tablespoons rice wine vinegar
2 tablespoons packed brown sugar
2 teaspoons sesame oil
1 teaspoon ground ginger
2 tablespoons cornstarch
1-1/4 pounds lean ground beef
1/2 small onion, chopped
1 teaspoon minced garlic
2 cups chopped bell peppers
2 cups cooked brown rice, divided
2 cups Basic Brown Rice
1 stalk of green onion, chopped, for garnish
1/2 teaspoon red pepper flakes, for garnish
4 teaspoons Sriracha, for garnish
Directions
In a small bowl, whisk together the water, soy sauce, rice wine vinegar, brown sugar, sesame oil, ginger, and cornstarch. Set aside.
Press Sauté (High) on the Instant Pot and add the ground beef. When the beef begins to brown (about 3 minutes), add in the onion, garlic, and bell peppers. Continue to cook for 5 minutes. When finished, press Cancel.
Stir in the sauce and select Pressure Cook (High) and Keep Warm (Off), adjust the timer to 5 minutes using the +/– button, and secure the lid. Ensure the vent is set to Sealing.
When the cooking completes, press Cancel, remove the lid, stir, and portion into 4 bowls, served over 1/2 cup of Brown Jasmine Rice. Garnish as desired with green onion, red pepper flakes, and Sriracha.
To make the recipe keto compliant, substitute a sugar replacement for the brown sugar. Because sugar substitutes are sweeter than sugar, use half the amount. Then serve with cauliflower rice.
Use a tamari sauce in place of soy to make the recipe gluten-free.
Turkey and Mushroom Meatloaf
Nothing is worse than showing up to an event without something to eat! That’s why our prep-ahead Turkey and Mushroom Meatloaf can be a keto follower’s best friend for a weekend away. Going camping? Cook ahead and modify by using an almond flour in place of the breadcrumbs. Reheat to 165 degrees (yes, you can do this over an open flame in the woods), and you’ll have a nourishing meal (not out of a package) in a matter of minutes.
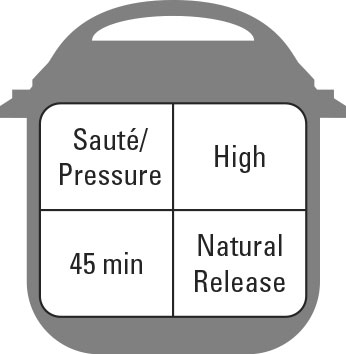
Instant Pot function: Sauté (High), Pressure Cook (High), Keep Warm (Off), Natural Release
Special tools: Three 4-inch loaf pans
Fits diets: Gluten-Free, Keto, Mediterranean
Prep time: 10 minutes
Cook time: 45 minutes
Yield: 6 servings
Ingredients
1 teaspoon extra-virgin olive oil
1/4 small onion, chopped
1 teaspoon minced garlic
3 large white mushrooms, finely diced
1 pound lean ground turkey
1 large egg
1 teaspoon Italian seasoning
1/2 teaspoon ground black pepper
1/8 teaspoon salt
1 tablespoon fresh chopped basil
1/2 cup whole-wheat breadcrumbs
6 tablespoons barbecue sauce
1 cup water
Directions
Press Sauté (High) on the Instant Pot, and place the oil in the inner pot. Add the onion, garlic, and mushrooms. Sauté for 10 minutes, until the mushrooms are tender. Press Cancel.
In a large bowl, combine the mushroom mixture with the ground turkey. Add in the egg, Italian seasoning, pepper, salt, basil, and breadcrumbs. Mix until uniformly combined. Liberally spray three 4-inch aluminum loaf pans with cooking spray. Divide the turkey mixture evenly into the loaf pans and top each loaf with 2 tablespoons of barbecue sauce.
Cover the loaf pans with aluminum foil. Rinse the inner pot and dry the outside. Place the insert back into the Instant Pot, and pour the water in. Position the metal trivet on the bottom and place 2 loaf pans on top; place the remaining loaf pan horizontally across the bottom pans. Close the lid and set to Sealing.
Press Pressure Cook (High) and Keep Warm (Off), and use the +/– button to set the timer to 35 minutes. When cooking completes, do a Natural Release of the pressure for 5 minutes, and then use Quick Release to remove the remaining pressure.
Remove the foil from the loaf pans, slice and serve.
These make an excellent freezer-friendly meal to enjoy later. Just reheat until the internal temperature of the meatloaf is 165 degrees.
Garlic Green Beans and Tomatoes
Green beans are non-starchy vegetables (along with artichokes, bok choy, cabbage, celery, mushrooms, and spinach — think of vegetables that grow aboveground.) Though tomatoes are a bit higher in carbohydrates, when eaten in moderation, they can absolutely fit into a keto diet! Pair our Garlic Green Beans and Tomatoes recipe with any meat, and we promise, you’ll be satiated and satisfied!
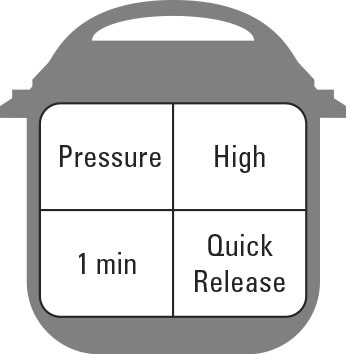
Instant Pot function: Pressure Cook (High), Keep Warm (On), Quick Release
Fits diets: Gluten-Free, Mediterranean, Vegan, Vegetarian
Prep time: 5 minutes
Cook time: 1 minute
Yield: 6 servings
Ingredients
1/2 cup water
1 pound fresh green beans, ends removed
2 cloves garlic, minced
1 lemon, zested and juiced
1/4 cup extra-virgin olive oil
1/2 teaspoon salt
1/4 teaspoon pepper
1/8 teaspoon onion powder
1 small red onion, thinly sliced
1 cup halved cherry tomatoes
Directions
Place the water into the inner pot of the Instant Pot. Add the green beans. Cover with the lid, set the valve to Sealing, and press Pressure Cook (High) and Keep Warm (Off). Adjust the time to 0 minutes using the +/– button.
Meanwhile, in a small bowl, whisk together the garlic, lemon zest, lemon juice, olive oil, salt, pepper, and onion powder.
When the cooking completes, do a Quick Release, and immediately place the green beans in an ice bath for 1 minute. (This helps retain the bright green color and halts the cooking process.)
In a serving bowl, toss the green beans, red onions, and cherry tomatoes together. Drizzle with the dressing, toss, and serve.
Use fresh asparagus instead of green beans for a seasonal twist.

1
Cheese Fondue with Jalapeños
Our Cheese Fondue with Jalapeños is a party-friendly appetizer that you and your friends on the keto bandwagon can enjoy! Serve this recipe alongside celery sticks, cauliflower, radishes, or even rolled meats. Remember, though: This is a pretty high-sodium dish, so be mindful of your portions and drink lots of water.
Instant Pot function: Pressure Cook (High), Keep Warm (Off), Quick Release
Special tools: Instant Pot–friendly casserole dish
Fits diets: Gluten-Free, Keto, Vegetarian
Prep time: 5 minutes
Cook time: 10 minutes
Yield: 8 servings
Ingredients
One 12-ounce can cheese soup
1/2 cup plain Greek yogurt
8 ounces shredded reduced-fat cheddar cheese
One 8-ounce canned diced jalapeño
1/2 teaspoon garlic powder
1 tablespoon yellow mustard
1/2 teaspoon paprika
1/4 teaspoon ground black pepper
1/4 teaspoon salt
1-1/2 cups water
1/4 cup chopped parsley, for garnish
Crusty bread, for serving
Tortilla chips, for serving
Directions
In a medium bowl, mix the cheese soup, yogurt, cheddar cheese, jalapeño, garlic powder, yellow mustard, paprika, pepper, and salt. Pour into an Instant Pot–friendly casserole dish and cover tightly with foil.
Press Pressure Cook (High) and Keep Warm (Off), and set the timer for 10 minutes using the +/– button.
Add the water to the base of the metal pot insert and place the metal trivet over the water. Position the pan on top of the trivet and secure the lid. Set the valve to Sealing.
When the cooking completes, press Cancel. Use Quick Release to remove the pressure.
Carefully remove the pan from the Instant Pot and discard the foil. Stir the cheese fondue one more time, and garnish with parsley.
Serve with crusty bread or tortilla chips, or use as a topping for tacos, nachos, or burgers.
If you prefer less-spicy foods, you can omit the jalapeños.
1
Cheese Fondue with Jalapeños
Our Cheese Fondue with Jalapeños is a party-friendly appetizer that you and your friends on the keto bandwagon can enjoy! Serve this recipe alongside celery sticks, cauliflower, radishes, or even rolled meats. Remember, though: This is a pretty high-sodium dish, so be mindful of your portions and drink lots of water.
Instant Pot function: Pressure Cook (High), Keep Warm (Off), Quick Release
Special tools: Instant Pot–friendly casserole dish
Fits diets: Gluten-Free, Keto, Vegetarian
Prep time: 5 minutes
Cook time: 10 minutes
Yield: 8 servings
Ingredients
One 12-ounce can cheese soup
1/2 cup plain Greek yogurt
8 ounces shredded reduced-fat cheddar cheese
One 8-ounce canned diced jalapeño
1/2 teaspoon garlic powder
1 tablespoon yellow mustard
1/2 teaspoon paprika
1/4 teaspoon ground black pepper
1/4 teaspoon salt
1-1/2 cups water
1/4 cup chopped parsley, for garnish
Crusty bread, for serving
Tortilla chips, for serving
Directions
In a medium bowl, mix the cheese soup, yogurt, cheddar cheese, jalapeño, garlic powder, yellow mustard, paprika, pepper, and salt. Pour into an Instant Pot–friendly casserole dish and cover tightly with foil.
Press Pressure Cook (High) and Keep Warm (Off), and set the timer for 10 minutes using the +/– button.
Add the water to the base of the metal pot insert and place the metal trivet over the water. Position the pan on top of the trivet and secure the lid. Set the valve to Sealing.
調理が完了したら、キャンセルを押します。クイックリリースを使用して圧力を取り除きます。
インスタントポットから鍋を注意深く取り出し、ホイルを捨てます。チーズフォンデュをもう一度かき混ぜ、パセリを飾る。
無愛想なパンやトルティーヤチップスを添えたり、タコス、ナチョス、ハンバーガーのトッピングとして使用したりできます。
辛さの少ない食べ物を好む場合は、ハラペーニョを省略できます。
1
スパイスの効いたクルミとカシューナッツ
甘い歯を満足させる必要がありますが、ケトはあなたの好きなデザートにノーと言うことを意味することを認識していますか?それなら、私たちのスパイスクルミとカシューナッツのレシピは素晴らしい頼みの綱です。クルミはオメガ3脂肪酸が豊富で、心臓に健康的な脂肪であり、体内で多くの有望な効果があることが示されています。このレシピを準備するとき、あなたはメープルをステビア、モンクフルーツ、エリスリトール、またはキシリトールのようなケトダイエットで一般的に承認された砂糖代替品と交換することができます。
ただし、注意が必要です。砂糖の代用品を初めて使用する場合は、部分に注意して、体がどのように反応するかを確認してください。砂糖の代用品を食べるとおなかのトラブルを報告する人もいます。
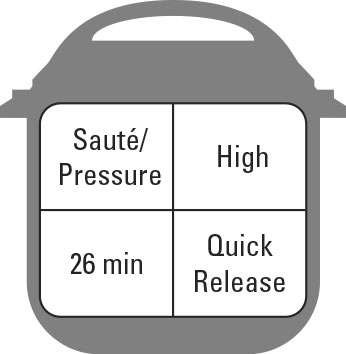
インスタントポット機能:ソテー(高)、圧力鍋(高)、保温(オフ)、クイックリリース
ダイエットに適しています:グルテンフリー、ケト、地中海、ビーガン、ベジタリアン
準備時間:なし
調理 時間: 26分
収量: 12人前
材料
1/4カップの純粋なメープルシロップ
バニラエッセンス小さじ1
小さじ1杯の挽いたシナモン
小さじ1杯のウコン
小さじ1/2の挽いたナツメグ
カイエンペッパー小さじ1/4
クルミ半分2カップ、生
カシューナッツ1カップ、生
1/3カップの水
ドライクランベリー1/2カップ
ゴマ大さじ2
小さじ1/2の塩
方向
インスタントポットでソテー(高)を押します。金属製の鍋に、メープルシロップ、バニラ、シナモン、ターメリック、ナツメグ、コショウを加えます。クルミとカシューナッツをかき混ぜてゆっくりと加え、約4分間調理します。
キャンセルを押します。水を加えてかき混ぜ、蓋を閉めます。バルブを設定シーリング、プレス圧力クック(ハイ)と(オフ)を暖かく保つ、および+/-ボタンを使用して8分にタイマーを設定します。その間、オーブンを300度に予熱します。
調理が完了したら、キャンセルを押し、クイックリリースを使用して圧力を取り除きます。
縁のある天板にパーチメント紙を敷き、クッキングスプレーでスプレーします。クランベリー、ゴマ、塩を鍋に入れ、ナッツと混ぜ合わせます。
ナッツの混合物を天板に広げます。オーブンに入れて8分焼き、かき混ぜて残り6分焼きます。オーブンから取り出し、10分間冷まします。仕える。
このレシピをケトに準拠させるには、純粋なメープルシロップの代わりに2〜3滴のモンクフルーツまたはステビア抽出物を使用します。
バルクビンから生のナッツを購入し、最適な鮮度を得るために冷凍庫に保管してください。
ナッツにはアーモンドとピーカンナッツを使用し、クランベリーには乾燥マンゴーを交換します。
持久力を向上させるチアの使用法について、チアシードが持つ健康上の利点を詳しく解説します。
この乳製品を含まない安っぽい卵料理は用途が広いので、お気に入りのフィリングを試してみてください。トーストしたサワードウパンの上で提供されるこのおいしい料理を試してみて、栄養価の高い迅速な朝食のためにポケットピタで残り物を再加熱してください。
ビーフシチューのレシピ。安い牛肉を使っておいしいシチューを作る方法を紹介します。
本物のエールのようにろ過も低温殺菌もされていないビールには、液体懸濁液に何百万もの生きた酵母細胞が含まれています。清澄剤はビールを迅速に明確にするために使用されます。
チキンヌードルスープは、ほとんどの人にとって一年中好きな食事です。自家製チキンヌードルスープは健康的で、簡単に作れます。
自宅で簡単にできるパレオダイエット用コブサラダのレシピ。新鮮な具材とパレオランチドレッシングを使って、短時間で健康的な食事を楽しめます。
フランスは、イタリアが生産する場合を除いて、他のどの国よりも多くのワインを生産しています。(両国は首と首です。)生産されるワインの量は、天候によって年ごとに異なります。一般的に言って、フランスは毎年約15億ガロンのワインを生産しています。幸いなことに、フランスワインの評判のために、[…]
フランスのボルドー地方では、より一般的に知られている赤のボルドーワインに加えて、世界で最も優れた白ワインがいくつか生産されています。ボルドーの最高級の辛口白ワインは、ボルドー地方特有のものです。世界のどこにもそのようなワインを見つけることができません。しかし、多くの高級ワインと同様に、その生産量は[…]
野菜は、ブランチングまたは蒸して約90%が完了するまで蒸した後、フライパンに移してバターとおそらく新鮮なハーブでソテーして仕上げると優れています。ジャガイモの多くの古典的なレシピはソテーを必要とします。薄くスライスした生じゃがいもは、このように調理すると美味しいです。フライパンのソテーレシピでは、カットします[…]
食道狭窄は、瘢痕組織の蓄積による食道の狭窄です。ほとんどの食道狭窄は良性(非癌性)ですが、狭窄は癌性になる可能性があります。狭窄が癌性であろうと良性であろうと、重大な健康問題につながる可能性があるため、真剣に受け止める必要があります。酸逆流はあなたをかなり可能性の高いものにします[…]

")